XRoar Dragon Emulator Manual
Table of Contents
About this manual
This manual is for XRoar (version 1.0.8), a Dragon and Tandy 8-bit computer emulator.
XRoar is free software; you can redistribute it and/or modify it under the terms of the GNU General Public License as published by the Free Software Foundation, either version 3 of the License, or (at your option) any later version.
XRoar is distributed in the hope that it will be useful, but WITHOUT ANY WARRANTY; without even the implied warranty of MERCHANTABILITY or FITNESS FOR A PARTICULAR PURPOSE. See the GNU General Public License for more details.
You should have received a copy of the GNU General Public License along with this program. If not, see <https://www.gnu.org/licenses/>.
1 Getting started
1.1 Introduction
XRoar emulates the Dragon 32/64; Tandy Colour Computers 1, 2 and 3; the Tandy MC-10; and some other similar machines or clones. It runs on a wide variety of platforms. Emulated hardware includes:
- Dragon 32, 64, and 200-E; Tandy CoCo 1, 2, & 3; Tandy MC-10.
- DragonDOS, Delta and RS-DOS disk controller cartridges.
- Orchestra 90-CC stereo sound cartridge.
- Games Master Cartridge, including the SN76489 sound chip.
- Glenside IDE cartridge, with IDE hard disk image support.
- NX32 and MOOH RAM expansions, with SPI and SD card image support.
Other features include:
- Raw and translated keyboard modes.
- Read and write tape images (compact .cas files or audio, e.g. .wav).
- Read and write VDK, JVC and DMK format floppy disk images.
- Becker port for communication with remote servers.
- Save and load machine snapshots.
- GDB target for remote debugging.
XRoar is easily built from source under Linux, and binary packages are provided for Mac OS X and Windows.
XRoar can also be compiled to WebAssembly, and redistributing it in this form may provide a convenient way for users to run your Dragon software. See XRoar Online for an example.
1.2 Notes for version 1.x
Version 1.x comes with support for two new emulated machines: the Tandy Colour Computer 3 and the Tandy MC-10. Some major changes have taken place under the hood, and although most things should remain familiar, for some special uses, here are the things you need to know.
Snapshots now store much more state, and of course support the new emulated machines, but this means the format had to change. Snapshots from the last 0.x release are still recognised, and can be loaded, but this support is likely to be removed in time.
The tape emulation now supports manual pause control. On the MC-10, this
defaults to paused, as it has no ability to remotely control the tape motor.
You will need to un-pause after typing CLOAD or CLOADM on the
MC-10 (File → Cassette → Play, or from the tape
control tool; autorunning will do this automatically).
Previously, the Glenside IDE controller would use a fixed HD image file in the current working directory called hd0.img. You must now specify an image with the -load-hd0 option. There is also the new ability to attach a second hard disk image with -load-hd1, if you have software that can access it.
Similarly, the NX32 and MOOH cartridges would use a fixed SD image file, and you must now specify it with the -load-sd option.
1.3 Prerequisites
After installing XRoar (see Installation), the first thing to do is make sure you have the firmware ROM images available for the system you wish to emulate. Without these, you will see rubbish on the screen (probably a checkerboard pattern, reflecting the initial state of RAM, see Troubleshooting).
These firmware images can be transferred from your original machine (with some effort, outside the scope of this document) or more likely found online on one of the archive websites. XRoar searches certain directories for these images, depending on platform, including (where ‘~’ indicates your "home directory"):
| Platform | ROM path |
|---|---|
| Unix/Linux | ~/.xroar/roms:prefix/share/xroar/roms |
| Windows | :~/Documents/XRoar/roms:~/AppData/Local/XRoar/roms: ~/AppData/Roaming/XRoar/roms |
| Mac OS X | ~/Library/XRoar/roms:prefix/share/xroar/roms |
Firmware ROM image files should have a .rom extension, and be headerless (so their file size will be an exact power of two bytes). For most use cases, you’ll need the BASIC ROM image(s) and a disk controller ROM image. Here are the expected filenames for the most common images:
| Firmware ROM | Filename | File size |
|---|---|---|
| Dragon 32 BASIC | d32.rom | 16K (16384 bytes) |
| Dragon 64 32K BASIC | d64_1.rom | 16K |
| Dragon 64 64K BASIC | d64_2.rom | 16K |
| DragonDOS | ddos10.rom | 8K (8192 bytes) |
| Tandy Colour BASIC | bas13.rom | 8K |
| Tandy Extended BASIC | extbas11.rom | 8K |
| Tandy Super ECB (CoCo 3) | coco3.rom | 32K (32768 bytes) |
| Tandy Super ECB (PAL CoCo 3) | coco3p.rom | 32K |
| Tandy RS-DOS | disk11.rom | 8K |
| Tandy Microcolour BASIC (MC-10) | mc10.rom | 8K |
Other machines (in particular the less common Dragon 200-E) will need a different set of ROM images, and other supported peripherals may also need their own firmware.
1.4 User-interface introduction
With the prerequisites satisfied, on running XRoar you should now be presented with a window showing an emulated machine with a menu bar at the top showing (at least) File, View, Hardware and Tool menus. Mac OS users will see the menu bar at the top of the whole screen instead. There are often keyboard shortcuts for these, detailed throughout this manual and listed in Keyboard shortcuts.
You can put XRoar into fullscreen mode by selecting View → Full Screen, but you will notice that the menu bar disappears. To return to windowed mode, use the keyboard shortcut CTRL+F, or just F11. You can also toggle the menubar manually by pressing CTRL+M.
As you type, you may notice that certain keys don’t produce the character you pressed. This is because by default, XRoar tries to map keys such that they closely approximate their locations on the machine being emulated, so minus on a modern PC keyboard types colon in the emulated machine. This is good for playing games, where key placement is often important. Be aware that some keys don’t have useful equivalents on modern keyboards: for CLEAR, press HOME, or the backtick key; for BREAK, press ESCAPE.
You can tell XRoar to translate PC keys to emulated keypresses by selecting Tool → Keyboard Translation. For more about the keyboard, including mapping keys, see Keyboard.
XRoar supports real joysticks, and simulating joysticks with the keyboard or mouse. You can select which method is used for each of the emulated joysticks in the Hardware → Right Joystick and Hardware → Left Joystick menus. The Keyboard option maps the cursor keys to joystick directions1, with ALT and SUPER mapped to the first and second firebuttons respectively2. The Mouse option relates the pointer position within the window to a joystick’s floating position, with the left mouse button bound being the firebutton. Much of this can be configured, see Joysticks.
The Hardware menu also allows you to select which machine to emulate, and attach a cartridge to the running machine. If ROM images were found for it, you’ll probably see that a disk cartridge is already attached. Swapping cartridges ’live’ is not something you’d generally do on a real machine, and if you change the selection, you may need to select Hardware → Hard Reset to see the effect.
1.5 Running programs
XRoar tries to make running programs easy; after all, it’s probably why you installed an emulator in the first place. Select File → Run to open a file requester, and select the program media image; in the majority of cases, and so long as the program was intended for the machine you have selected, XRoar will "do the right thing" to try and start it.
As with much automation, we can’t foresee every eventuality, and sometimes you’ll have to launch the program manually. In this case, you can still simply attach the image (without autorunning it) by selecting File → Load, then follow the programs own instructions.
Here’s what XRoar tries to do with various types of media image. XRoar uses filename extensions to decide how to handle an image, so be sure to check that this is correct.
ROM cartridge images typically have a .rom extension (just like the firmware ROM images). XRoar will create and insert a ROM cartridge (it will appear in the list under Hardware → Cartridge) and, if autorunning, set it up to generate the autostart signalling and hard reset the emulated machine.
For cassette images (usually a .cas or .wav), XRoar will try to determine the type of the first program in the image, and autorunning will issue the ‘CLOAD’ or ‘CLOADM’ command accordingly, followed by ‘EXEC’ or ‘RUN’ as appropriate. See Cassettes.
The only standard way of autostarting the program on a disk image is through its boot sectors, so in this case XRoar will issue the ‘BOOT’ (Dragon) or ‘DOS’ (Tandy CoCo) command. These are the most likely to fail as many disk images do not have boot sectors: read the instructions for yours! Disk images can come in many formats, and the file extension is used to discriminate; the most common are VDK (.vdk extension) or JVC (.dsk extension). See Floppy disks.
1.6 Troubleshooting
1.6.1 No BASIC ROM
The most common issue when first using XRoar. You start the emulator and only see a checkerboard pattern of orange and inverse ‘@’ signs (or on the CoCo 3, some other pattern that’s not the usual copyright messages). This probably indicates that XRoar could not locate any BASIC ROM images. Acquire some and put them in the directory appropriate to your platform.
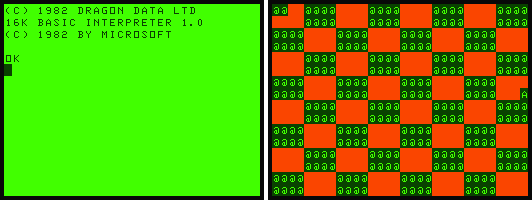
Figure 1.1: Emulator with and without BASIC ROM
1.6.2 Program lacks colour
You remember a program being in colour, but all you see is black and white.
American software was often written to exploit cross-colour artefacts, where alternating patterns of black and white would "trick" the TV into displaying colour. XRoar supports this, and should enable it by default when you choose an NTSC machine. If you’re running an NTSC game on a PAL machine, you can still force XRoar to render the colours by selecting a cross-colour option from View → TV Input. There are also options that affect the fidelity of this rendering. See Video output for more details.
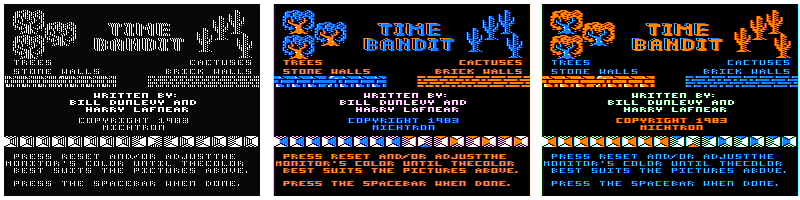
Figure 1.2: Time Bandit, Dunlevy & Lafnear, 1983 in different cross-colour modes
1.6.3 Can’t access HD/SD image
If you’ve been using previous versions of XRoar with the IDE, MOOH, or NX32 cartridges, you now need to specify the image filename with -load-hd0 (HD image for IDE) or -load-sd (SD image for NX32, MOOH).
1.6.4 Debug messages
XRoar prints diagnostic messages to standard output and standard error, and these may help narrow down a problem. You can increase their verbosity with various command-line options. See Debugging for more information.
Windows generally does not show these messages by default. but you can allocate a console by running XRoar from the command line and including -C as the very first option.
2 Configuration
XRoar can be configured by placing options into a configuration file, or by specifying options on the command line. The file is read first, then any command line options take precedence.
Many options may be preceded by ‘no-’ to invert their meaning or reset their value.
To print the current configuration to standard output (suitable for redirection to a config file), run with -config-print. This will include all the built-in machine and cartridge definitions. For a complete version including default values, use -config-print-all.
2.1 The configuration file
The configuration file is called xroar.conf. Good default locations for
xroar.conf are listed in Installation, but it is actually searched
for in a list of directories. You can override this search path with the
XROAR_CONF_PATH environment variable, which contains a colon-separated
(‘:’) list of directories. Here are the defaults:
| Platform | Default XROAR_CONF_PATH |
|---|---|
| Unix/Linux | ~/.xroar:prefix/etc:prefix/share/xroar |
| Mac OS X | ~/Library/XRoar:~/.xroar:prefix/etc:prefix/share/xroar |
| Windows | :~\Documents\XRoar:~\AppData\Local\XRoar:~\AppData\Roaming\XRoar |
Note the leading ‘:’ in the Windows default indicates an empty entry, meaning it will look in the current working directory first (i.e. you can put xroar.conf into the directory from which you run XRoar).
A leading tilde character (‘~’) indicates the user’s home directory: the
HOME environment variable on Unix systems, or USERPROFILE on
Windows. prefix is the installation prefix, which is usually
/usr/local.
To bypass the search path and start XRoar using a specific configuration file, pass -c file as the very first option to XRoar.
Directives are listed in xroar.conf one per line. They contain an option, possibly followed by whitespace and a value. Trailing whitespace is ignored. Empty lines are skipped, and any line where the first non-whitespace character is a hash (‘#’) is treated as a comment. Options do not need their leading dash (‘-’) in the configuration file.
If a value contains special characters, or if you want trailing whitespace to be included in the value, you must escape those characters. Sections contained within pairs of single or double quotes are escaped, except the backslash (‘\’) which introduces an escape sequence:
| Sequence | Description |
|---|---|
| ‘\0’ | Null (NUL), ASCII 0. Note that this is only permitted when not followed by another octal digit, as it may be confused with an octal byte, so it may be preferable to use ‘\x00’ instead. |
| ‘\a’ | Bell (BEL), ASCII 7, no equivalent on the Dragon keyboard. |
| ‘\b’ | Backspace (BS), ASCII 8, LEFT. |
| ‘\e’ | Escape (ESC), ASCII 27, no equivalent on the Dragon keyboard, but mapped to BREAK by the -type option. |
| ‘\f’ | Form Feed (FF), ASCII 12, CLEAR. |
| ‘\n’ | Newline (NL), ASCII 10, DOWN. Not usually used by the Dragon as a line ending, instead try ‘\r’. |
| ‘\r’ | Carriage Return (CR), ASCII 13, ENTER. |
| ‘\t’ | Horizontal Tab (HT), ASCII 9, RIGHT. |
| ‘\v’ | Vertical Tab (VT), ASCII 11, no equivalent on the Dragon keyboard. |
| ‘\nnn’ | 8-bit byte with value specified as a three-digit octal number, nnn. |
| ‘\xhh’ | 8-bit byte with value specified as a two-digit hexadecimal number, hh. |
| ‘\uhhhh’ | 16-bit Unicode codepoint specified as a four-digit hexadecimal number, hhhh. Internally, this will be encoded as UTF-8. |
Any other character following a backslash—including another backslash—is included verbatim. For example, this will be necessary in the configuration file under Windows when file paths include the backslash as a directory separator.
2.2 Command line options
On the command line, it is assumed that your shell will handle argument quoting, so any quote characters will be included verbatim. Escape sequences are still parsed, except when an option expects a filename, as shells often use their own escaping mechanisms when autocompleting filename arguments.
3 Machines
3.1 Machine profiles
XRoar creates a list of machine profiles from built-in and user-supplied configuration. One of these profiles is selected at startup, using either the -m name option (short for -default-machine name) on the command line, or by XRoar testing each profile in turn to see if its configured ROM image files are available.
Each machine profile has a base architecture (specified with the -machine-arch option). See Machines for details of the supported architectures, and which machine profiles are built-in.
| -m name, -default-machine name | Default machine profile to select on startup. |
| -machine name | Create or modify named machine profile. The remaining options configure the profile. -machine help lists currently defined profiles. |
| -machine-desc text | Description shown in -machine help and menu options. |
| -machine-arch arch | Base machine architecture. See Machines for a list. ‘dragon32, dragon64, coco, coco3’ or ‘mc10’. |
| -machine-keyboard type | Override the type of keyboard attached to machine. ‘dragon, dragon200e, coco’ or ‘coco3’. |
| -machine-cpu cpu | Fitted CPU. One of ‘6809’ or ‘6309’. Not applicable to the MC-10. |
| -bas rom | ROM image for Colour BASIC (CoCo) or Microcolour BASIC (MC-10). |
| -extbas rom | ROM image for Extended BASIC (Super Extended BASIC on the CoCo 3). |
| -altbas rom | ROM image for 64K-mode Extended BASIC (Dragon 64, Dragon 200-E). |
| -no-bas, -no-extbas, -no-altbas | Indicate the corresponding ROM is not fitted in this machine. |
| -ext-charset rom | ROM image to use for external character generator. |
| -tv-type type | One of ‘pal’, ‘ntsc’ or ‘pal-m’. PAL-M is treated the same as NTSC, except with magenta-green cross-colour instead of blue-red (simulated composite rendering only at the moment). |
| -tv-input input | One of ‘cmp’ (composite video, no cross-colour), ‘cmp-br’ (composite video, blue-red cross-colour), ‘cmp-rb’ (composite video, red-blue cross-colour) or ‘rgb’ (RGB video, CoCo 3 only). |
| -vdg-type type | Indicate the VDG variant fitted. One of ‘6847’ or ‘6847t1’. |
| -ram kbytes | Amount of RAM fitted in kilobytes. Valid sizes are 4-64K for Dragon and Tandy CoCo 1/2; 128K or 512K for the Tandy CoCo 3; 2K, 4K or 20K for the Tandy MC-10. |
| -machine-cart name | Default cartridge to attach. |
| -no-machine-cart | Indicate that XRoar is not to automatically attempt to attach a DOS cartridge to this machine (the default is to try). |
For example, if the following lines were placed in your xroar.conf, a new machine could be selected with -m pippin:
machine pippin
  machine-desc "Dragon Pippin (prototype)"
  machine-arch dragon32
  ram 16
3.2 Machine architectures
XRoar supports several underlying machine architectures, and has one or more built-in machine profile configurations based on each one. See Machine profiles for more information on modifying or creating profiles. The rest of this section describes the available architectures.
3.2.1 Dragon 32
Released in 1982, the Dragon 32 closely follows Motorola’s reference design for the MC6809 CPU, MC6883 Synchronous Address Multiplexer and the MC6847 Video Display Generator. Dragon Data also chose to make it electrically compatible with some of Tandy’s peripherals for their Colour Computer; notably the joystick and cartridge ports. In addition, it has a parallel port, making it compatible with the majority of printers on the market at the time.
Architecture ‘dragon32’. Built-in machine profile ‘dragon32’.
3.2.2 Dragon 64
The Dragon 64 was released the next year, in 1983. In upped the on-board RAM to 64K and provided a reassembled version of Microsoft BASIC to make use of it. It also added a serial port, though that is not yet emulated by XRoar.
There are a few more changes to the motherboard than just extra RAM, so XRoar treats this as a separate architecture.
Architecture ‘dragon64’. Built-in machine profiles: ‘dragon64’, ‘tano’ (American NTSC version of Dragon 64 by Tano), ‘dragon200e’ (localised Spanish Dragon 64 from Eurohard).
3.2.3 Tandy Colour Computer 1/2
An earlier (1980) Tandy machine made using Motorola’s reference design, primarily marketed in the USA. Sold at many price points, with 4K (originally), 16K, 32K or 64K of RAM and either with or without Extended Colour BASIC. Later versions came with a new version of the VDG, the MC6847T1, which included true lowercase characters.
Architecture ‘coco’. Built-in machine profiles: ‘coco’, ‘cocous’ (NTSC), ‘coco2b’ (T1), ‘coco2bus’ (NTSC, T1), ‘mx1600’ (Mexican clone by Dynacom).
3.2.4 Tandy MC-10
Released in 1983, a little too late to compete with the Sinclair ZX-81, it was discontinued a year later. A cut-down machine based on the Motorola MC6803, but still using the MC6847 VDG and containing a version of Microsoft BASIC. Comes with 4K of RAM, but much of the small amount of software available for it assumes an additional 16K RAM pack.
Architecture ‘mc10’. Built-in machine profile ‘mc10’.
3.2.5 Tandy Colour Computer 3
In 1986, Tandy released the Colour Computer 3. They had developed a custom chip, the TCC1014 (GIME), with VLSI to replace the SAM and VDG, and it supported extended graphics modes, more memory (up to 512K directly) and a timer function, along with somewhat better interrupt handling and the ability to run at twice the clock speed. A major development, it maintained a high degree of compatibility with its predecessors, losing some lesser-used (in the USA) graphics modes.
The CoCo 3 generates different colours depending on whether you use the Composite Video or RGB outputs. The NTSC version defaults to assuming Composite Video, while the PAL version always used the RGB output from the GIME.
Architecture ‘coco3’. Built-in machine profiles: ‘coco3’ (NTSC), ‘coco3p’ (PAL).
4 Cartridges
4.1 Cartridge profiles
Similarly, XRoar contains a list of cartridge profiles, each with an underlying type.
| -cart name | Create or modify named cartridge profile. -cart help lists currently defined profiles. The remaining options configure the profile. |
| -cart-desc text | Cartridge description shown in -cart help and menu options. |
| -cart-arch arch | Cartridge architecture. See Cartridge types for a list. |
| -cart-rom file | The ROM image specified will be mapped from $C000. |
| -cart-rom2 file | The ROM image specified will be mapped from $E000. |
| -cart-becker | Enable Becker port where supported. |
| -cart-autorun | Auto-start cartridge using FIRQ. |
There are no cartridges usable with the MC-10 yet (the 16K expansion is technically a cartridge, but XRoar currently emulates that as though it were on-board).
Built-in cartridge profiles exists with sensible defaults for each of the cartridge types except ‘rom’ (for which a profile is simply created when you try to autorun a ROM image), each with the same name as the type.
Defining new cartridge profiles is most usefully done in the configuration file, for example:
cart mydos
  cart-desc "SuperDOS E6"
  cart-arch dragondos
  cart-rom sdose6.rom
  cart-rom2 dosdream.rom
This will define a cartridge called ‘mydos’ as a DragonDOS cartridge with its ROM replaced with sdose6.rom, and an additional ROM called dosdream.rom (this was my setup in the 80s - DOS Dream is a very useful ROM-based editor/assembler/deugger that coexists with DragonDOS - advert over).
XRoar will automatically attempt to find a disk interface relevant to the current machine unless a specific default has been configured for the machine with -machine-cart, or automatic selection is disabled with the -no-machine-cart option.
Selecting a ROM image file with the -load or -run command line options, or with CTRL+L or CTRL+SHIFT+L, will attach a ROM cartridge.
Within the emulator, cartridges can be enabled or disabled by pressing CTRL+E. You will almost certainly want to follow this with a hard reset (CTRL+SHIFT+R).
4.2 Cartridge types
XRoar supports several types of cartridge, and has at least one built-in cartridge profile configurations for each one. See Cartridge profiles for more information on modifying or creating profiles. The rest of this section describes the available types.
4.2.1 DragonDOS
The official Dragon Data disk system for the Dragon. Supports 80 track, double sided, double-density floppy disks.
Emulation supports the Becker port mapped to $FF49/$FF4A, if enabled.
Type ‘dragondos’. Built-in cartridge profile ‘dragondos’.
4.2.2 Delta
Premier Microsystems’ alternative Dragon disk system. Apparently two versions of this may have existed; XRoar emulates the double-density version.
Type ‘delta’. Built-in cartridge profile ‘delta’.
4.2.3 RS-DOS
Tandy’s disk interface for the CoCo. Typically supports only 35-track single-sided double-density disks, though more is accessible using OS-9.
Emulation supports the Becker port.
Type ‘rsdos’. Built-in cartridge profile ‘rsdos’, ‘becker’ (with Becker port enabled, expecting hdbdw3bck.rom).
4.2.4 Glenside IDE controller
Interfaces the Tandy CoCo to up to two IDE hard disks. Its IO is generally memory mapped to addresses $FF50–$FF58. Also optionally supports the Becker port.
The controller supports up to two drives, and you can specify the image to use in each with -load-hd0 file or -load-hd1 file. If file does not exist, a 256MB empty image is created when the controller first tries to access it.
Sectors are 512 bytes, and while some software may use all 512, others only access 256 bytes per sector, padding the other 256 bytes (or simply doubling them up).
Type ‘ide’. Built-in cartridge profile ‘ide’.
4.2.5 NX32 and MOOH cartridges
Two memory expansion cartridges created by Tormod Volden for the Dragon. Both accept an SD card image. These images have no header information and contain 256-byte sectors.
The earlier NX32 provides simple bank switching, while the MOOH provides extensive MMU functionality very like that in the Tandy CoCo 3.
Types ‘nx32’, ‘mooh’. Built-in cartridge profiles: ‘nx32’, ‘mooh’. Both require fleshing out with ROM information, and an SD card image specified, e.g.:
cart mooh
  cart-rom sdbdos-eprom8-all-v1.rom

load-sd "~/xroar/sdcard.img"
4.2.6 Games Master Cartridge
The Games Master Cartridge (‘gmc’), created by John Linville, provides the ability to bank switch up to 64K of cartridge ROM, along with an on-board SN76489 sound chip.
This cartridge type is selected automatically (and configured to autostart) if you autorun a ROM image larger than 16K.
Type ‘gmc’. Built-in cartridge profile ‘gmc’ is configured with no ROM installed, and to not auto-start.
4.2.7 Orchestra 90-CC sound cartridge
A simple expansion that provides two 8-bit DACs for stereo sound (but still driven by the CPU). An on-board ROM for the CoCo provides an interface to composition, but if autorun is disabled, the hardware itself works fine on the Dragon.
Type ‘orch90’. Built-in cartridge profile ‘orch90’.
4.2.8 Multi-Pak Interface
The Multi-Pak Interface (‘mpi’) is a CoCo add-on by Tandy that allows up to four cartridges to be connected, selectable by software or hardware switch.
The RACE Computer Expansion Cage is a Dragon add-on by RACE similar to the MPI. Addressing and behaviour differs.
If you attach either Multi-Pak Interface (MPI), you’ll want to populate one or more of its slots (numbered 0-3). Use -mpi-load-cart [slot=]name to attach a named cartridge to the specified (or next) slot. Configure the initially selected slot with -mpi-slot slot.
It’s not recommended to load more than one DOS cartridge into the MPI. As things stand, only the last one (in slot order) will have the emulated drives properly connected.
Types ‘mpi’, ‘mpi-race’. Built-in cartridge profiles: ‘mpi’, ‘mpi-race’ (RACE variant).
machine coco
  machine-cart mpi

mpi-load-cart 0=orch90
mpi-load-cart 3=rsdos
mpi-slot 3
4.2.9 Becker port
Not a cartridge in and of itself, XRoar supports an emulator-only feature that enables it to connect to a server using a TCP connection and access remote facilities such as disk images and MIDI devices—the Becker port. This appears as a memory-mapped device, and XRoar supports it as an optional feature of many cartridge types.
Enable this port when configuring a cartridge with -cart-becker. The -becker option tells XRoar to prefer a cartridge with it enabled when automatically selecting one.
The IP and port to connect to can be specified with the -becker-ip and -becker-port options. These default to ‘127.0.0.1’ and ‘65504’ respectively, matching the defaults for pyDriveWire and DriveWire 4.
5 Storage media
5.1 Cassettes
Cassette tape was the primary method of loading software until floppy disk drives were available, and remained popular for games distribution even then as it served the largest market. Data is encoded onto cassette tape as audio, all currently-emulated machines using the same format, where a single cycle represents one bit of data, and its wavelength determines the bit’s value.
The Dragon and Tandy Colour Computers have a built-in cassette relay that can control the cassette motor remotely, but the MC-10 does not. After you type the appropriate load command on an MC-10, you will have to manually start the player.
XRoar supports tapes as raw sampled audio in WAV format (.wav), or in the more compact CAS format (.cas) which represents bits of data directly (files for the MC-10 are typically still CAS format, but with a .c10 extension; these will also work).
An extension to the CAS format called CUE is also supported. This comprises extra data at the end of the file that marks up the CAS file to indicate portions of silence, or the wavelength used for each bit. This enables it to better represent the structure of the original tape, support certain fast loaders, yet for data within the file to remain readable with a hex editor if it is correctly aligned.
XRoar can also attach BASIC ASCII text files (with .bas or .asc file extensions) and interpret them as cassettes, providing a useful way to edit these in your favourite text editor before loading into the emulator. Note: this feature is not supported by the MC-10.
The tape used for writing is considered separate to the read tape (this is an emulator-friendly approach to prevent overwriting your programs, though it would have been possible with two cassette decks).
Under Windows and Mac OS, the File → Cassette menu contains controls to insert or rewind the input and output tapes, play/pause and toggle options.
In the Unix/Linux GTK+ interface, these options are available from the tape control dialog, which you can open with Tool → Tape control or by pressing CTRL+T. This dialog will also show you the programs found on a cassette and allow you to double click them to seek to the appropriate position.
| -load-tape file | Attach file as tape image for reading. |
| -tape-write file | Open file for tape writing. |
| -tape-pan position | Pan stereo input. Floating point number from ‘0.0’ (full left) to ‘1.0’ (full right). The default of ‘0.5’ mixes the two channels equally. |
| -tape-hysteresis pc | Read hysteresis as percentage of full scale (default is 1%). |
| -no-tape-fast | Disable fast tape loading. The default is enabled, which uses ROM intercepts to speed up loading. |
| -no-tape-pad-auto | Disable automatic padding of short leaders in CAS files (see below). |
| -tape-ao-rate hz | Set tape writing frame rate to hz (affects audio file output, e.g. WAV). Default: ‘9600’Hz. |
| -tape-rewrite | Enable tape rewriting (see below). |
| -tape-rewrite-gap-ms ms | Gap length in milliseconds to write in rewrite mode (1-5000ms, default 500ms). |
| -tape-rewrite-leader n | Length of leaders in bytes to write in rewrite mode (1-2048 bytes, default 256). |
| -snap-motoroff file | Write a snapshot to file each time the cassette motor is switched off. |
Tape padding defaults to on, may be useful to disable with -no-tape-pad-auto if you are having trouble loading. A lot of old CAS tape images were created with their leaders truncated. This worked fine in emulators that fully intercepted the ROM to load them, but causes issues when converted to audio to play out to a real machine.
Tape rewriting, enabled with -tape-rewrite is a special mode where the ROM is intercepted, and anything read from the input tape is rewritten to the output tape. Custom loaders may defeat it, but otherwise this is a good way of creating a well-formed CAS file, with bytes aligned and consistent leader lengths.
The -snap-motoroff file option is useful for getting a dump of the machine state at the moment a program has finished loading, but before it has started executing. If you specify file with a .ram extension, you can get a simple RAM dump, viewable in a hex editor.
5.2 Floppy disks
Floppy disk drives provide much faster access to data than cassette tape. Initially costly, prices did fall somewhat, so these became a fairly common expansion.
If a disk interface cartridge is selected, XRoar supports virtual disks. Three virtual disk formats are supported:
| -load-fdX file | Load disk image file file into drive X (0–3). |
| -disk-write-back | Default to enabling write-back for disk images. |
| -no-disk-auto-os9 | Don’t try to detect headerless OS-9 JVC disk images. |
| -no-disk-auto-sd | Don’t assume single density for 10 sector-per-track disks. |
Under Windows and Mac OS, the File → Drive X menus allow you to insert or eject disks, create new disks, or toggle the write-enable and write-back options.
In the Unix/Linux GTK+ interface, these options are available from the disk control dialog, which you can open with Tool → Disk control or by pressing CTRL+D.
Note that RS-DOS for the Tandy Colour Computer numbers its drives from zero instead of one, so when you perform operations on Drive 1, from the CoCo’s point of view, that will be Drive 0.
| -load-fdX file | Load disk image file file into drive X (0–3). |
| -disk-write-back | Default to enabling write-back for disk images. |
| -no-disk-auto-os9 | Don’t try to detect headerless OS-9 JVC disk images. |
| -no-disk-auto-sd | Don’t assume single density for 10 sector-per-track disks. |
When you attach a disk, it is read into memory, and subsequent disk operations are performed on this in-memory copy. Write enable defaults to on (so write operations on the copy will work), but write back defaults to off, so updates will not be written back to the disk image file. This default protects your files from being corrupted, but you can change the default behaviour to turn write back on with the -disk-write-back option.
Even with write-back enabled, disk images are not usually rewritten until they are ejected, changed, or you quit the emulator. However, you can force rewriting the image files at any time by pressing CTRL+SHIFT+D.
The JVC format specifies that the disk images without headers are single-sided, but some double-sided disk images have been made available without headers. These cannot normally be distinguished from a single-sided disk that happens to have twice the number of tracks. If an OS-9 filesystem is present, the identification sector is inspected to determine the correct disk structure. This step will always be performed for headerless images with the .os9 filename extension, but may be disabled for the other valid JVC filename extensions with -no-disk-auto-os9.
5.3 Hard disks
The Glenside IDE controller interfaces hard disks to the Tandy CoCo, and the MOOH and NX32 memory expansions can each provide access to an SD card.
Hard disk images consist of 512 bytes of header information, 512 bytes of IDENTIFY information, followed by sector data in LSN order, 512 bytes each. If an image does not exist when accessed, a 256MB image is created for you, as the header information may be difficult to construct otherwise.
SD images contain no header information, just sector data in LSN order, 256-bytes each.
| -load-hdX file | Use file as the hard disk image for drive X (0 or 1). |
| -load-sd file | Use file as the SD card image. |
6 Peripherals
6.1 Keyboard
| -keymap code | Specify host keyboard layout. -keymap help for a list. Default: ‘uk’ |
| -kbd-bind hkey=[pre:]dkey | Bind host key hkey to emulated key dkey. |
| -kbd-translate | Start up in translated keyboard mode. |
| -type string | Intercept ROM calls to type string into BASIC on startup. |
The default mapping of host keys to emulated keys is based on the original positions of the keys, with certain exceptions: cursor keys are mapped directly, Escape maps to the Dragon’s BREAK key, and Home maps to CLEAR. Other keys may also be mapped to CLEAR if there is a choice in your selected keymap that doesn’t conflict with a regular character in translated mode.
When binding keys with -kbd-bind, if the emulated key dkey is prefixed with "preempt:" or "pre:", this binding preempts translation; useful for modifier keys. Interpretation of hkey depends on which user-interface toolkit is in use, and it might be useful to run with -debug-ui 1 to see what the toolkit calls your host keys.
Special values for dkey are: ‘colon’, ‘semicolon’, ‘comma’, ‘minus’, ‘fullstop’, ‘period’, ‘dot’, ‘slash’, ‘at’, ‘up’, ‘down’, ‘left’, ‘right’, ‘space’, ‘enter’, ‘clear’, ‘break’, ‘escape’, ‘shift’, ‘alt’, ‘ctrl’, ‘control’, ‘f1’, ‘f2’.
For position-based mapping (untranslated), XRoar needs to be informed of the layout of the host’s keyboard. If it is not the default (UK), use the -keymap code option. This is basically the equivalent of a pre-rolled list of -kbd-bind options.
XRoar can also be put into translated keyboard mode, where characters typed on a PC keyboard are translated into the equivalent keystrokes on the Dragon. Use the -kbd-translate option to default to this mode. Press CTRL+Z at any time to toggle between the two modes.
In translated mode, SHIFT+Return is mapped to the Caps Lock combination (SHIFT+0 usually, SHIFT+ENTER on the Dragon 200-E). Similarly, SHIFT+Space is mapped to the pause output combination (SHIFT+@ usually, SHIFT+Space on the Dragon 200-E).
The keyboards of the Dragon and Tandy CoCo operate in the same way, but the matrix and/or key layouts differ. When you select a machine, the appropriate layout is selected for you, but you can toggle between them by pressing CTRL+K, which can sometimes be useful when running software designed for the other machine.
XRoar will simulate the ghosting effects inherent in a simple matrix design, but the accuracy of this simulation will depend very much on your host keyboard, which vary greatly in the amount of simultaneous keypresses they support (for more information, search for “NKRO”).
6.2 Joysticks
Analogue joysticks are very common peripherals for the Dragon and Tandy CoCo. Many games require them, and some productivity applications even use them as a mouse-like input device. Joysticks are electrically compatible between the machines, though some CoCo joysticks use a 6-pin DIN connector instead of 5-pin DIN, and these will not plug into the Dragon. On the CoCo 3, this extra pin can carry the signal for an extra firebutton.
XRoar can simulate these analogue joysticks using a variety of input methods. There are a few built-in joystick configuration profiles, or new ones can be defined. Here are the built-ins:
| Name | Description |
|---|---|
| ‘joy0’ | First two axes and first two buttons of first physical joystick |
| ‘joy1’ | First two axes and first two buttons of second physical joystick |
| ‘kjoy0’ | Keyboard based virtual joystick using cursor keys and Left Alt. |
| ‘mjoy0’ | Mouse based virtual joystick mapped to screen position |
If present, ‘joy0’ maps to the Dragon’s right joystick port, and ‘joy1’ to the left joystick port. You can specify different profiles to map with -joy-right name or -joy-left name. Select which joystick is mapped to each port at any time with the Hardware → Right joystick or Hardware → Left joystick menus. You can also swap the left and right joystick mappings by just pressing CTRL+SHIFT+J.
They keyboard-based virtual joystick can be quickly cycled through the ports by pressing CTRL+J. The first press will map it to the right joystick, the second to the left joystick instead, and pressing a third time unmaps it. You can change which virtual joystick is cycled in this way with the -joy-virtual name option.
The MC-10 has no built-in joystick ports, but an expansion (that can not be used at the same time as the 16K RAM expansion!) allows the connection of digital joysticks. These are not yet supported by XRoar.
| -joy name | Create or modify named joystick profile. -joy help lists currently defined profiles. |
| -joy-desc text | Joysticks description shown in -joy help. |
| -joy-axis axis=input:[args] | Configure joystick axis. -joy-axis help to list physical joysticks. |
| -joy-button btn=input:[args] | Configure joystick button. -joy-button help to list physical joysticks. |
| -joy-right name | Map right joystick. |
| -joy-left name | Map left joystick. |
| -joy-virtual name | Specify the virtual joystick to cycle. Default: ‘kjoy0’ |
The axis and button mapping options used while configuring a profile need some explaining.
Configure axes with -joy-axis axis=input:[args]. The axis is either ‘X’ or ‘Y’ (or numbered 0–1).
Configure buttons with -joy-button button=input:[args]. The button is either 0 (first button), or 1 (second button—only useful on the CoCo 3).
In both cases, the input selects a source for the input from the list below, and the args specify which one to use.
| Input | Axis args | Button args |
|---|---|---|
| ‘physical’ | joystick-index,[-]axis-index | joystick-index,button-index |
| ‘keyboard’ | key-name0,key-name1 | key-name |
| ‘mouse’ | screen-offset0,screen-offset1 | button-number |
The ‘-’ before the axis index when configuring a physical joystick will invert that axis. Key names for the keyboard module depend on the underlying toolkit. The default screen offsets for the mouse module are ‘X=2,254’ and ‘Y=1.5,190.5’ which gives reasonable behaviour for some games and utilities.
To list the physical joysticks seen by XRoar, with the index numbers to use in the options above, specify either -joy-axis help or -joy-button help.
Joystick configuration is complex, but flexible. For example, you can combine input sources by specifying different modules for each axis. This configuration example creates a profile called ‘mixed’ that uses the mouse for the X-axis and firebutton, but the keys A and Z on the keyboard for the Y-axis. It then ensures this profile is the one used when you press CTRL+J.
joy mixed
  joy-axis X=mouse:
  joy-axis Y=keyboard:a,z
  joy-button mouse:

joy-virtual mixed
6.3 Printers
The Dragon machines have parallel printer ports, and XRoar supports these, sending output either to a file, or through a command pipe. The pipe approach allows you to apply a filter to the output, and/or send it to a real attached printer using normal Unix commands (SUB: check whether Windows users can do this sort of thing yet).
The CoCo and MC-10 machines have serial printer ports. XRoar doesn’t support these directly yet, but a limited form of print redirection is implemented using a ROM BASIC intercept. This is enough to support BASIC commands like LLIST, but will not cope with programs implementing their own serial routines.
| -lp-file file | Append printer output to file. |
| -lp-pipe command | Pipe printer output to command. |
Use the -lp-file file option to send printer output to a file, or -lp-pipe command to send it through a pipe. Pressing CTRL+SHIFT+P will flush the current stream by closing it, so if you are using a pipe, the filter will complete. The stream will be re-opened when any new data is sent.
Under Unix, the enscript utility is good for processing output and
sending it to a configured printer, e.g. -lp-pipe "enscript -B -N r -d
printer-name". This will send a job to your printer, using carriage
returns as line feeds (the Dragon default), each time you press
CTRL+SHIFT+P (or exit the emulator).
7 Files
| -load file | Load or attach file. XRoar will try to do the right thing based on the file type (usually determined by file extension). |
| -run file | As -load, but try to autorun the file after attaching. |
| -load-tape file | Attach file as tape image for reading. See Cassettes. |
| -tape-write file | Open file for tape writing. See Cassettes. |
| -load-fdX file | Load disk image file file into drive X (0–3). See Floppy disks. |
| -load-hdX file | Use file as the hard disk image for drive X (0 or 1). See Hard disks. |
| -load-sd file | Use file as the SD card image. See Hard disks. |
| -lp-file file | Append printer output to file. See Printers. |
In general, files can be attached on the command line with -load file, or by pressing CTRL+L. XRoar judges the type of file based on its filename extension. To attempt to intelligently autorun a file, use -run file or press CTRL+SHIFT+L. See Running programs for the methods XRoar will use to autorun a file.
Cassettes, Floppy disks, and Hard disks are each discussed in Storage media. The other kinds of file recognised by XRoar are discussed here.
7.1 ROM cartridges
ROM cartridge images have a .rom or .ccc filename extension. Because XRoar supports other types of cartridge, loading a ROM image actually just creates a cartridge instance of type ‘rom’.
7.2 Snapshots
XRoar can save out a snapshot of the emulated machine state and read the snapshots back in later. To save a snapshot, press CTRL+S. When using CTRL+L to load a file, anything ending in .sna will be recognised as a snapshot.
Most internal state should be dumped to the snapshot. External data like ROM images or disk image files will be referenced by name, so when you read the snapshot back in, they need to exist in the same place they were before.
State that is explicitly not included in snapshots includes Becker port DriveWire connections and GDB listen parameters. These will use your local settings, which default to interacting with the local host only.
Note that the snapshot format has changed since version 0.37 to accommodate the new CoCo 3 and MC-10 support, along with other complex device state. The old snapshot format is deprecated, but can still be read for now.
7.3 Binary files
File types containing raw binary data to be loaded into RAM:
| Extension | Description |
|---|---|
| .bin | Binary file (DragonDOS or CoCo). XRoar can load these directly into memory and optionally autorun them. Read-only |
| .hex | Intel hex record. An ASCII format that encodes binary data and where in memory to load it. Read-only |
7.4 Firmware ROM images
Firmware ROM image files are configured as part of a machine or a cartridge. They have a filename extension of .rom or .dgn, and can be specified as:
- Complete path to a file.
- Base filename of an image, to be discovered within a search path.
- Base filename of an image, omitting the extension. XRoar will search as above, appending the known ROM filename extensions.
- An ‘@’ character followed by the name of a ROM list.
A ROM list is a comma-separated list of images, each following the rules above. ROM lists may refer to other ROM lists. Define a ROM list with -romlist name=image[,image]…. View the defined ROM lists with -romlist-print.
To make life easier, the default image for each type of machine or cartridge usually refers to a ROM list which contains all the corresponding filenames seen in the wild, the primary examples being:
| Firmware ROM | ROM list | Canonical image names |
|---|---|---|
| Dragon 32 BASIC | ‘@dragon32’ | d32.rom |
| Dragon 64 32K BASIC | ‘@dragon64’ | d64_1.rom |
| Dragon 64 64K BASIC | ‘@dragon64_alt’ | d64_2.rom |
| Dragon 200-E 32K BASIC | ‘@dragon200e’ | d200e_1.rom |
| Dragon 200-E 64K BASIC | ‘@dragon200e_alt’ | d200e_2.rom |
| Dragon 200-E Charset | ‘@dragon200e_charset’ | d200e_26.rom |
| Tandy Colour BASIC | ‘@coco’ | bas13.rom, bas12.rom, bas11.rom, bas10.rom |
| Tandy Extended BASIC | ‘@coco_ext’ | extbas11.rom, extbas10.rom |
| Tandy Super ECB (CoCo 3) | ‘@coco3’ | coco3.rom |
| Tandy Super ECB (PAL CoCo 3) | ‘@coco3p’ | coco3p.rom |
| Tandy Microcolour BASIC | ‘@mc10’ | mc10.rom |
| DragonDOS | ‘@dragondos_compat’ | dplus49b.rom, sdose6.rom, ddos10.rom |
| Delta System | ‘@delta’ | delta.rom |
| RS-DOS | ‘@rsdos’ | disk11.rom, disk10.rom |
| RS-DOS with Becker port | ‘@rsdos_becker’ | hdbdw3bck.rom |
| Orchestra 90-CC | ‘orch90.rom’ |
The default search path for images specified only as a base filename varies by platform, and is detailed in Getting started. This path can can be overridden with the option -rompath path, where path is a colon-separated list of directories to search.
The XROAR_ROM_PATH environment variable can also be used to specify the
search path, but this behaviour is deprecated and may be removed in a future
version.
A CRC32 value is calculated and reported for each ROM image loaded. XRoar uses these CRCs to determine whether certain breakpoints can be used (e.g. for fast tape loading). The lists of CRCs matched can be defined in a similar way to ROM lists using the -crclist list=crc[,crc]… option. Each crc is a 8-digit hex number preceded by ‘0x’, or the name of a nested list preceded by ‘@’. Use this if you have a modified version of a BASIC ROM that maintains compatible entry points with an original. View the current lists with -crclist-print.
Sometimes it may be useful to force CRC matching so that breakpoints apply (e.g. you are modifying a ROM image and don’t wish to have to add its CRC to the match list each time you modify it). The -force-crc-match option forces the CRCs to be as if an original ROM image were loaded.
8 User interface
8.1 User interface selection
The user interface depends on supporting toolkit packages as described in Building from source. Selection of user interface module may affect which other types of module are available: in particular, video output is strongly tied to the user interface.
| -ui module | Select user-interface module. -ui help to list compiled-in modules. |
8.1.1 GTK+ user interface
Select with -ui gtk2.
This is the most full-featured user interface. It provides extensive dynamic menus, and control tools for cassette and disk files. This is the preferred interface under Linux.
Only one video module is usable with this user interface: ‘gtkgl’.
8.1.2 SDL user interface
Select with -ui sdl.
More limited than the GTK+ interface, providing keyboard shortcuts and, in the Mac OS X and Windows variants, some basic menus.
Under Mac OS X, many operations are usable by pressing Command+key as well as the usual shortcut of CTRL+key.
8.1.3 NULL user interface
Select with -ui null.
Show nothing! This can actually be useful when running XRoar from a script or, if you like, to act as a music player. To disable audio too, run with -ao null. XRoar will happily emulate a machine for you with nothing to show for it.
8.2 Video output
| -fs | Start full-screen. Toggle full-screen with CTRL+F or F11. |
| -fskip frames | Specify frameskip. Default is ‘0’. May be helpful on slower machines. |
| -gl-filter filter | Filtering method to use when scaling the screen. One of ‘linear’, ‘nearest’ or ‘auto’ (the default). OpenGL output modules only. |
| -invert-text | Start up with inverted text mode. |
| -ccr renderer | Composite video cross-colour renderer. One of ‘simple’ (very fast), ‘5bit’ (fast, more accurate) or ‘simulated’ (slow, very accurate). Default is ‘5bit’. |
Real NTSC machines start in one of two cross-colour states at random. Games often prompt the user to “Press Enter if the screen is red”, for example. You can press CTRL+A, to cycle through three modes: Off, Blue-red and Red-blue. On the CoCo 3, a fourth mode is included that switches to the RGB output.
Inverted text mode may be toggled by pressing CTRL+SHIFT+I.
8.3 Audio output
| -ao module | Select audio output module. -ao help for a list. |
| -ao-device device | Module-specific device specifier. e.g. /dev/dsp for OSS. |
| -ao-format format | Specify audio sample format. -ao-format help for a list. |
| -ao-rate hz | Specify audio frame rate, where supported. The default is taken from the operating system if possible, otherwise it will usually be ‘48000’. |
| -ao-channels n | Specify number of channels (1 or 2). Default is usually ‘2’. |
| -ao-fragments n | Specify number of audio fragments. |
| -ao-fragment-ms ms | Specify audio fragment size in milliseconds. |
| -ao-fragment-frames n | Specify audio buffer size in frames. |
| -ao-buffer-ms ms | Specify total audio buffer size in milliseconds. |
| -ao-buffer-frames n | Specify total audio buffer size in frames. |
| -ao-gain db | Specify audio gain in dB relative to 0 dBFS. Only negative values really make sense here. Default: ‘-3.0’ |
| -volume volume | Older way to specify volume. Simple linear scaling, using values 0–100. |
Audio latency is a concern for emulators, so XRoar allows the buffering characteristics to be configured with the fragment and buffer options above. Not all audio modules support all options, but setting the total audio buffer size will usually have an effect. Bear in mind that any figures reported by XRoar reflect what it was able to request, and won’t include any extra buffering introduced by the underlying sound system.
When the Orchestra 90-CC cartridge is attached, its stereo output needs to be mixed with the Dragon’s normal audio. To allow a small amount of headroom for this, the default gain is set to ‘-3.0’ (dB relative to full scale), but be aware that it would still be possible for this to clip depending on what’s happening on the internal sound bus. A setting of -ao-gain -9.0 would give plenty of headroom (at the expense of a quieter overall sound).
9 Debugging
| -gdb | Enable GDB target. |
| -gdb-ip address | Address of interface for GDB target. Default: ‘127.0.0.1’ |
| -gdb-port port | Port for GDB target to listen on. Default: ‘65520’ |
| -trace | Start with trace mode on. CTRL+V toggles. |
| -debug-fdc flags -debug-file flags -debug-gdb flags -debug-ui flags | Various per-subsystem debugging flags. The special value ‘-1’ enables all flags for the subsystem. |
| -v level --verbose level | General debug verbosity (0–3). Default: ‘1’ |
| -q --quiet | Equivalent to -verbose 0. |
| -timeout n | Exit emulator after running for n seconds. |
| -timeout-motoroff n | Exit emulator n seconds after cassette motor switches off, or end of tape reached. |
| -snap-motoroff file | Write a snapshot to file each time the cassette motor switches off, or end of tape reached. |
XRoar can act as a remote target for GDB using a network socket. When GDB connects, emulation is stopped. GDB can then inspect memory, instruct the target to set breakpoints and watchpoints (read, write and access), single step or continue execution. A version of GDB patched to specifically support 6809 targets can also perform disassembly and inspect registers. For more information on how to use GDB, see the GDB Documentation.
Enable the GDB remote target with -gdb. The default IP and port for the target are ‘127.0.0.1’ and ‘65520’. These can be overridden with the -gdb-ip and -gdb-port options.
XRoar also supports a simpler trace mode, where it will dump a disassembly
of every instruction it executes to the console. Toggle trace mode on or off
with CTRL+V. Trace mode can be enabled from startup with the
-trace option. Very useful when piped through less, as you
can use simple text searches.
Note that GDB support is not currently implemented for the 6803 used by the MC-10, but trace mode is.
User-interface debugging flag can be enabled with -debug-ui value, where only one value is currently supported:
| 0x0001 | Keyboard event debugging. |
Hex & binary file debugging can be enabled with -debug-file value, where the value is a bitwise ORing of the following:
| 0x0001 | Print summary information such as load or exec addresses. |
| 0x0002 | Hex dump of all data read into memory. |
| 0x0004 | Print filename block metadata when autorunning a tape. |
Floppy controller debugging can be enabled with -debug-fdc value, where the value is a bitwise ORing of the following:
| 0x0001 | Show FDC commands. |
| 0x0002 | Show all FDC states. |
| 0x0004 | Hex dump of read/write sector data. |
| 0x0008 | Hex dump of Becker port conversation data. |
| 0x0010 | General FDC event debugging. |
The GDB stub can also emit debug information about its own operation with -debug-gdb value, where value is a bitwise ORing of:
| 0x0001 | Connection open and close. |
| 0x0002 | Show packet data. |
| 0x0004 | Checksum reporting. |
| 0x0008 | Report on general queries. |
The special value argument of -1 parses as all bits set, and so enables all corresponding debug options.
XRoar prints various other informational messages to standard output by default, including when the state of certain toggles is modified. Verbosity can be changed with the -verbose level option. -quiet is equivalent to -verbose 0. Levels are:
| 0 | Quiet. Only warnings and errors printed. |
| 1 | Print startup diagnostics and emulator state changes (default). |
| 2 | Report some emulated machine state changes. |
| 3 | Miscellaneous internal debugging. |
XRoar can be told to exit after a number of (emulated) seconds with the -timeout seconds option.
XRoar can quit a number of seconds after the cassette motor is switched off with the -timeout-motoroff seconds option. This is useful in the case of automatic tape rewriting. A value of 1 is usually sufficient to account for the brief motor click that occurs after header blocks and during gapped loading.
Similarly, a snapshot can be automatically written after loading with the -snap-motoroff file option. The file is overwritten each time the motor transitions to off. This can be used to help analyse the machine state immediately after loading, before any autorun code has taken effect (specifying a .ram snapshot may be particularly useful here for analysis).
To see debug output from the pre-built Windows binary, run it with -C as the first option to allocate a console.
10 Acknowledgements
Early on, I made reference to the MAME 6809 core for clues on how the overflow bit in the condition code register was handled.
Darren Atkinson’s Motorola 6809 and Hitachi 6309 Programmers Reference has been very useful for 6309 support and fleshing out some of the illegal instructions on the 6809.
Alan Cox contributed the IDE code.
Tormod Volden contributed support for his NX32 and MOOH devices (including general SPI and SD image support).
Greg Dionne and Ron Klein have been very helpful with information and testing of MC-10 related behaviour.
Various other people have also provided feedback or test cases that have helped nail down bugs; read the ChangeLog for details.
And thanks to all the people on the Dragon Archive Forums, CoCoTALK! Discord and IRC that have provided helpful feedback and insight.
Appendix A Installation
A.1 Binary packages
Pre-built binary packages are available from the XRoar home page. If one is not available for your architecture, you will need to build from source. XRoar should build and run on any POSIX-like system for which SDL version 2 is available.
You will also need BASIC ROM images—binary dumps of the firmware from an original machine. The originals were part-written by Microsoft, so they are not distributed in the XRoar packages.
A.1.1 Mac OS X binary package
Download and unzip the appropriate .zip distribution for your system. Drag the application icon to /Applications/.
For troubleshooting or testing options, it’s often a good idea to run from the
command line, but application packages don’t make that trivial. A symbolic
link to somewhere in your PATH is all that’s required. e.g.:
$ sudo ln -s /Applications/XRoar.app/Contents/MacOS/xroar \
        /usr/local/bin/xroar
After this, you can start the emulator by simply typing xroar
followed by any command line options.
ROM images should be placed in a directory you create under your HOME
named ~/Library/XRoar/roms/ (not the system directory,
/Library/). Name any configuration file you create
~/Library/XRoar/xroar.conf.
The Mac OS X build provides a menu for access to certain features, and often accepts the more familiar Command+key in place of the CTRL+key shortcuts listed in this manual.
A.1.2 Windows binary package
Download and unzip the appropriate .zip distribution for your system.
The easiest way forward is to simply put ROM images into the directory created when you unzip the distribution, and then run the .exe straight from there. You can also put any configuration file (xroar.conf) here.
However, if you want to avoid having to move files around each time you upgrade, you can create Documents/XRoar to contain your configuration file, and a subdirectory of that, Documents/XRoar/roms for ROM images.
Note when troubleshooting that the logging from the Windows binary is probably only going to be visible if you run it with the -C option (must be the first option) to allocate a console.
The Windows build provides menu-based access to certain features.
A.2 Building from source
A.2.1 Dependencies
If there is no binary package for your system, you will have to build from source. XRoar can use various backend toolkits, and you will need to ensure you have their development files installed. If you’re using Debian, this can (at the time of writing) be achieved with the following simple command:
$ sudo apt install build-essential libsndfile1-dev libgtk2.0-dev \
        libgtkglext1-dev libasound2-dev
Under Mac OS X, first be sure to install Apple’s Xcode package. The easiest way to then ensure you have XRoar’s dependencies available is to use a system like Homebrew or MacPorts. For Homebrew, the following command will install the required dependencies:
$ brew install libsndfile sdl2
Otherwise, you’ll have to do a bit of platform-specific research to ensure you have all the dependencies for a full build:
GTK+, the GIMP toolkit, provides the most full-featured user interface. It is only usable as such if you also have GtkGlExt, an OpenGL extension used to provide video output. Otherwise, it can provide a file requester for use by other user interfaces. Version 2 only.
SDL, Simple Directmedia Layer, provides a slightly more basic user experience. Menus are added using native code under Mac OS X and Windows; any other target using SDL will support only keyboard shortcuts. Unless you are building for Linux, SDL is required to use joysticks. Version 2 required.
POSIX Regular Expressions are used in option parsing, so TRE is required on non-POSIX platforms (e.g. Windows).
Other supported audio APIs: OSS, ALSA, PulseAudio, CoreAudio. Some other options are still in the code base, but have not been tested in a while.
libsndfile is recommended to enable support for using audio files as cassette images.
A.2.2 Compilation
Once you have the dependencies, building XRoar follows a familiar procedure:3
$ gzip -dc xroar-1.0.8.tar.gz | tar xvf -
$ cd xroar-1.0.8
$ ./configure
$ make
$ sudo make install
The configure script has a lot of options guiding what it tests for,
specifying cross-compilation, changing the install path, etc. List them all
with the --help option.
By default, configure will set up an install prefix of
/usr/local, but this can be changed by using the
--prefix=path option.
Once built, run make install as root (or use sudo, as in
the example above) to install the binary and info documentation on your system.
The executable is called xroar. ROM images should be placed either in
your home directory as ~/.xroar/roms/, or under the installation
prefix as prefix/share/xroar/roms/. Any configuration
file should be created as ~/.xroar/xroar.conf.
XRoar can be built on one platform to run on another. The Windows binary
package is built like this. To specify a cross-compile, use the
--host=host argument to configure. For example, to
build for Windows, you might use ‘./configure --host=i686-w64-mingw32’.
Getting everything just so for a cross-build can be a tricky procedure, and
the details are beyond the scope of this manual.
XRoar can be built to a WebAssembly target using
Emscripten. With the SDK installed, run
emconfigure ./configure --enable-wasm to set up the build
environment. Build with emmake make. HTML/JavaScript and CSS
examples for interfacing to the output are included in the wasm/
subdirectory.
Appendix B Keyboard shortcuts
A summary of commonly available keyboard shortcuts.
| CTRL+[1-4] | Insert disk into drive 1–4. |
| CTRL+SHIFT+[1-4] | Create new disk in drive 1–4. |
| CTRL+[5-8] | Toggle write enable on disk in drive 1–4. |
| CTRL+SHIFT+[5-8] | Toggle write back on disk in drive 1–4. |
| CTRL+A | Cycle through cross-colour modes (and RGB on CoCo 3). |
| CTRL+D | Open disk control tool (GTK+ only). |
| CTRL+SHIFT+D | Flush disk images. |
| CTRL+E | Toggle cartridge on/off - reset to take effect. |
| CTRL+F or F11 | Toggle full screen mode. |
| CTRL+SHIFT+H or PAUSE | Halt the CPU (not on the MC-10). |
| CTRL+SHIFT+I | Toggle text mode inverse video. |
| CTRL+J | Cycle through joystick emulation modes (None, Right, Left). |
| CTRL+SHIFT+J | Swap left and right joysticks. |
| CTRL+K | Toggle Dragon/CoCo keyboard layout (not on the MC-10). |
| CTRL+L | Load a file. |
| CTRL+SHIFT+L | Load and attempt to autorun a file. |
| CTRL+M | Toggle menubar. |
| CTRL+SHIFT+P | Flush printer output. |
| CTRL+Q | Quit emulator. |
| CTRL+R | Soft reset emulated machine. |
| CTRL+SHIFT+R | Hard reset emulated machine. |
| CTRL+S | Save a snapshot. |
| CTRL+T | Open the tape control tool (GTK+ only). |
| CTRL+V | Toggle trace mode. |
| CTRL+W | Attach a virtual cassette file for writing. |
| CTRL+Z | Enable keyboard translation mode. |
| F12 | Run at maximum speed while held. |
| SHIFT+F12 | Maximum speed toggle. |
Appendix C File formats
XRoar recognises most file types by their file extension.
| Extension | Description |
|---|---|
| .cas, .c10 | Compact cassette image. CUE data can optionally mark up silence and the wavelength to use for each bit. |
| .bas, .asc | ASCII BASIC files. XRoar will wrap the ASCII text in the appropriate file structure to present to the emulated machine as saved ASCII BASIC. Does not work on the MC-10. Read-only. |
| .wav | Standard audio data file can be used as a cassette image. |
| .dmk | Disk image file in a format defined by David Keil. These images store a lot of information about the structure of a disk and support both single and double density data. |
| .jvc, .os9, .dsk | Disk image file in a basic sector-by-sector format with optional header information. |
| .vdk | Another disk image file format, used by PC-Dragon. |
| .sna | XRoar-specific snapshots preserve machine state. Old v1 snapshots can still be read, but writing a snapshot uses the new v2 format. |
| .ram | When a .ram extension is given while writing a snapshot, a simple RAM dump is generated instead. Write-only. |
| .bin, .dgn, .cco | Binary file in DragonDOS or RS-DOS format (autodetected). Read-only. ,, |
| .hex | Intel hex record. An ASCII format that encodes binary data and where in memory to load it. Read-only. |
| .rom, .ccc | ROM image file. Simple binary dump of a ROM IC. Machine firmware images and ROM cartridge images are in this format. Read-only. |
Appendix D Option list
Options may be specified in the configuration file, xroar.conf, or on the command line. The leading dash (‘-’) is not required in the configuration file.
| Startup options | |
|---|---|
| -C | Allocate a console window to see debug messages (Windows-only). |
| -c file | Specify a different configuration file. |
| -no-c | Don’t read the configuration file. |
| -no-builtin | Disable built-in configuration. Unless you also define a machine yourself, XRoar will abort. |
| Machines | See Machines. |
|---|---|
| -m name, -default-machine name | Default machine profile to select on startup. |
| -machine name | Create or modify named machine profile. The remaining options configure the profile. -machine help lists currently defined profiles. |
| -machine-desc text | Description shown in -machine help and menu options. |
| -machine-arch arch | Base machine architecture. See Machines for a list. ‘dragon32, dragon64, coco, coco3’ or ‘mc10’. |
| -machine-keyboard type | Override the type of keyboard attached to machine. ‘dragon, dragon200e, coco’ or ‘coco3’. |
| -machine-cpu cpu | Fitted CPU. One of ‘6809’ or ‘6309’. Not applicable to the MC-10. |
| -bas rom | ROM image for Colour BASIC (CoCo) or Microcolour BASIC (MC-10). |
| -extbas rom | ROM image for Extended BASIC (Super Extended BASIC on the CoCo 3). |
| -altbas rom | ROM image for 64K-mode Extended BASIC (Dragon 64, Dragon 200-E). |
| -no-bas, -no-extbas, -no-altbas | Indicate the corresponding ROM is not fitted in this machine. |
| -ext-charset rom | ROM image to use for external character generator. |
| -tv-type type | One of ‘pal’, ‘ntsc’ or ‘pal-m’. PAL-M is treated the same as NTSC, except with magenta-green cross-colour instead of blue-red (simulated composite rendering only at the moment). |
| -tv-input input | One of ‘cmp’ (composite video, no cross-colour), ‘cmp-br’ (composite video, blue-red cross-colour), ‘cmp-rb’ (composite video, red-blue cross-colour) or ‘rgb’ (RGB video, CoCo 3 only). |
| -vdg-type type | Indicate the VDG variant fitted. One of ‘6847’ or ‘6847t1’. |
| -ram kbytes | Amount of RAM fitted in kilobytes. Valid sizes are 4-64K for Dragon and Tandy CoCo 1/2; 128K or 512K for the Tandy CoCo 3; 2K, 4K or 20K for the Tandy MC-10. |
| -machine-cart name | Default cartridge to attach. |
| -no-machine-cart | Indicate that XRoar is not to automatically attempt to attach a DOS cartridge to this machine (the default is to try). |
| Cartridges | See Cartridges. |
|---|---|
| -cart name | Create or modify named cartridge profile. -cart help lists currently defined profiles. The remaining options configure the profile. |
| -cart-desc text | Cartridge description shown in -cart help and menu options. |
| -cart-arch arch | Cartridge architecture. See Cartridge types for a list. |
| -cart-rom file | The ROM image specified will be mapped from $C000. |
| -cart-rom2 file | The ROM image specified will be mapped from $E000. |
| -cart-becker | Enable Becker port where supported. |
| -cart-autorun | Auto-start cartridge using FIRQ. |
| Multi-Pak Interface | See Multi-Pak Interface. |
|---|---|
| -mpi-slot slot | Initially select slot (0–3). |
| -mpi-load-cart [slot]=name | Insert cartridge into next or numbered slot. |
| Becker port | See Becker port. |
|---|---|
| -becker | Prefer becker-enabled DOS cartridge when picked automatically. |
| -becker-ip address | Address or hostname of DriveWire server. Default: ‘127.0.0.1’ |
| -becker-port port | Port of DriveWire server. Default: ‘65504’ |
| Cassettes | See Cassettes. |
|---|---|
| -load-tape file | Attach file as tape image for reading. |
| -tape-write file | Open file for tape writing. |
| -tape-pan position | Pan stereo input. Floating point number from ‘0.0’ (full left) to ‘1.0’ (full right). The default of ‘0.5’ mixes the two channels equally. |
| -tape-hysteresis pc | Read hysteresis as percentage of full scale (default is 1%). |
| -no-tape-fast | Disable fast tape loading. The default is enabled, which uses ROM intercepts to speed up loading. |
| -no-tape-pad-auto | Disable automatic padding of short leaders in CAS files (see below). |
| -tape-ao-rate hz | Set tape writing frame rate to hz (affects audio file output, e.g. WAV). Default: ‘9600’Hz. |
| -tape-rewrite | Enable tape rewriting (see below). |
| -tape-rewrite-gap-ms ms | Gap length in milliseconds to write in rewrite mode (1-5000ms, default 500ms). |
| -tape-rewrite-leader n | Length of leaders in bytes to write in rewrite mode (1-2048 bytes, default 256). |
| -snap-motoroff file | Write a snapshot to file each time the cassette motor is switched off. |
| Floppy disks | See Floppy disks. |
|---|---|
| -load-fdX file | Load disk image file file into drive X (0–3). |
| -disk-write-back | Default to enabling write-back for disk images. |
| -no-disk-auto-os9 | Don’t try to detect headerless OS-9 JVC disk images. |
| -no-disk-auto-sd | Don’t assume single density for 10 sector-per-track disks. |
| Hard disks | See Hard disks. |
|---|---|
| -load-hdX file | Use file as the hard disk image for drive X (0 or 1). |
| -load-sd file | Use file as the SD card image. |
| Keyboard | See Keyboard. |
|---|---|
| -keymap code | Specify host keyboard layout. -keymap help for a list. Default: ‘uk’ |
| -kbd-bind hkey=[pre:]dkey | Bind host key hkey to emulated key dkey. |
| -kbd-translate | Start up in translated keyboard mode. |
| -type string | Intercept ROM calls to type string into BASIC on startup. |
| Joysticks | See Joysticks. |
|---|---|
| -joy name | Create or modify named joystick profile. -joy help lists currently defined profiles. |
| -joy-desc text | Joysticks description shown in -joy help. |
| -joy-axis axis=input:[args] | Configure joystick axis. -joy-axis help to list physical joysticks. |
| -joy-button btn=input:[args] | Configure joystick button. -joy-button help to list physical joysticks. |
| -joy-right name | Map right joystick. |
| -joy-left name | Map left joystick. |
| -joy-virtual name | Specify the virtual joystick to cycle. Default: ‘kjoy0’ |
| Printers | See Printers. |
|---|---|
| -lp-file file | Append printer output to file. |
| -lp-pipe command | Pipe printer output to command. |
| Files | See Files. |
|---|---|
| -load file | Load or attach file. XRoar will try to do the right thing based on the file type (usually determined by file extension). |
| -run file | As -load, but try to autorun the file after attaching. |
| -load-tape file | Attach file as tape image for reading. See Cassettes. |
| -tape-write file | Open file for tape writing. See Cassettes. |
| -load-fdX file | Load disk image file file into drive X (0–3). See Floppy disks. |
| -load-hdX file | Use file as the hard disk image for drive X (0 or 1). See Hard disks. |
| -load-sd file | Use file as the SD card image. See Hard disks. |
| -lp-file file | Append printer output to file. See Printers. |
| Firmware ROM images | See Firmware ROM images. |
|---|---|
| -rompath path | Set ROM search path. A colon-separated list of directories. |
| -romlist name=list | Define a ROM list. |
| -romlist-print | Print defined ROM lists and exit. |
| -crclist name=list | Define a CRC list. |
| -crclist-print | Print defined CRC lists and exit. |
| -force-crc-match | Force per-architecture CRC matching. |
| User interface | See User interface selection. |
|---|---|
| -ui module | Select user-interface module. -ui help to list compiled-in modules. |
| Video output | See Video output. |
|---|---|
| -fs | Start full-screen. Toggle full-screen with CTRL+F or F11. |
| -fskip frames | Specify frameskip. Default is ‘0’. May be helpful on slower machines. |
| -gl-filter filter | Filtering method to use when scaling the screen. One of ‘linear’, ‘nearest’ or ‘auto’ (the default). OpenGL output modules only. |
| -invert-text | Start up with inverted text mode. |
| -ccr renderer | Composite video cross-colour renderer. One of ‘simple’ (very fast), ‘5bit’ (fast, more accurate) or ‘simulated’ (slow, very accurate). Default is ‘5bit’. |
| Audio output | See Audio output. |
|---|---|
| -ao module | Select audio output module. -ao help for a list. |
| -ao-device device | Module-specific device specifier. e.g. /dev/dsp for OSS. |
| -ao-format format | Specify audio sample format. -ao-format help for a list. |
| -ao-rate hz | Specify audio frame rate, where supported. The default is taken from the operating system if possible, otherwise it will usually be ‘48000’. |
| -ao-channels n | Specify number of channels (1 or 2). Default is usually ‘2’. |
| -ao-fragments n | Specify number of audio fragments. |
| -ao-fragment-ms ms | Specify audio fragment size in milliseconds. |
| -ao-fragment-frames n | Specify audio buffer size in frames. |
| -ao-buffer-ms ms | Specify total audio buffer size in milliseconds. |
| -ao-buffer-frames n | Specify total audio buffer size in frames. |
| -ao-gain db | Specify audio gain in dB relative to 0 dBFS. Only negative values really make sense here. Default: ‘-3.0’ |
| -volume volume | Older way to specify volume. Simple linear scaling, using values 0–100. |
| Debugging | See Debugging. |
|---|---|
| -gdb | Enable GDB target. |
| -gdb-ip address | Address of interface for GDB target. Default: ‘127.0.0.1’ |
| -gdb-port port | Port for GDB target to listen on. Default: ‘65520’ |
| -trace | Start with trace mode on. CTRL+V toggles. |
| -debug-fdc flags -debug-file flags -debug-gdb flags -debug-ui flags | Various per-subsystem debugging flags. The special value ‘-1’ enables all flags for the subsystem. |
| -v level --verbose level | General debug verbosity (0–3). Default: ‘1’ |
| -q --quiet | Equivalent to -verbose 0. |
| -timeout n | Exit emulator after running for n seconds. |
| -timeout-motoroff n | Exit emulator n seconds after cassette motor switches off, or end of tape reached. |
| -snap-motoroff file | Write a snapshot to file each time the cassette motor switches off, or end of tape reached. |
| Help options | |
|---|---|
| -config-print | Print configuration to standard out. |
| -config-print-all | Print configuration to standard out, including defaults. |
| -h, --help | Print help text and exit. |
| -V, --version | Print version information and exit. |
In addition, various other options accept ‘help’ as an argument to print a list of values they accept.
Footnotes
(1)
While mapped as a joystick, the cursor keys won’t work as actual emulated keys.
(2)
The second firebutton is only useful on the CoCo 3.
(3)
If you have cloned the git repository, you will need GNU
Build System packages installed: ‘autoconf’, etc. Running
./autogen.sh should then generate the configure script, which you can
run as normal.