| It all started with this thing. The first computer I had was a TRS-80 Model III in the early
80's. It was a nice one piece machine with 16K (Later upgraded to 48K), in a big metallic grey case. It could display 64 columns and 16 lines
of text with lowercase and the graphics consisted of 128x48 black or white pixels - which wasn't so great even
back then when compared to the Apple II. But, it was easy to program, and ran fairly quickly. |

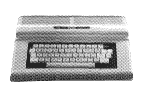
| I never actually had one of these when they came out, but I did get one as a collectors item
a couple of years ago. My CoCo1 has 64K, a replaced (better) keyboard, and a neat reverse video switch on the
bottom left of the case in case I got tired of looking at a fluorescent green screen all day long. |
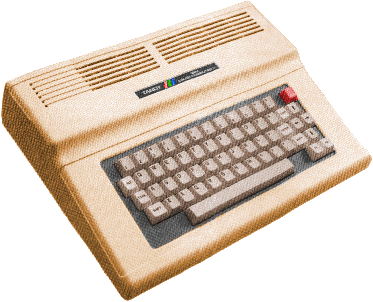
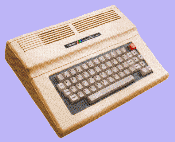
| This is actually the next computer I got after the Model III. In some ways it was a step
backwards, and in others a step forward. This computer has 64K, and can do graphics up to 256x192 pixels,
but the text display of 32 columns and 16 lines in uppercase or reverse was lousy. Other than the limited
display, though, this is still a neat machine for the hacker/hobbyist or programmer. |
| Then one day I finally got the Color Computer 3. Originally it came had 128K of RAM, a 1.79Mhz 68B09E CPU.
It's capable of 80 columns by 28 lines of text in color with lowercase, and can do 640x225 resolution graphics and it has 64 colors.
Later on I upgraded to 512K (but some lucky folks have 1 or 2Megs of RAM). I've also tinkered with the
hardware a bit and have stuck a 4Mhz Hitachi 63B09E into it (Designed my own clock doubler circuit to make it run at 4Mhz.)
|
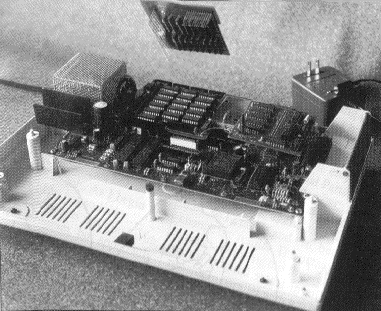
| I don't actually have one of these, but one can dream :) This is the Disto 1Meg upgrade kit. It's two more daughter
boards you plug into the CoCo, that's why it looks so odd with all those boards sitting there. There is also a 2Meg upgrade, and now I
actually have one to show (below).
|
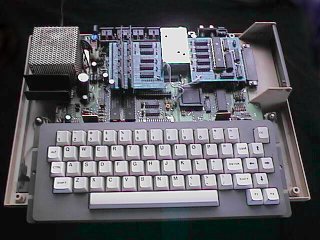
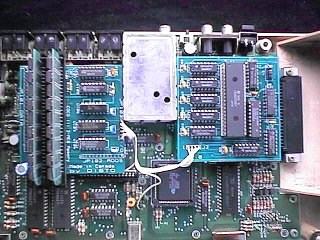
| I recently got a Disto 2Meg board installed in my CoCo3, so here's a picture to show what it looks like. It works
great, although I haven't actually done too much to take advantage of the extra memory yet! It's two small boards, one that plugs into
the CPU socket, and the other goes into the memory connectors with a few wires going between the two. Click on the picture to get a
closer view.
|
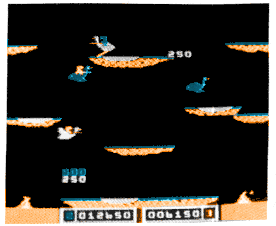
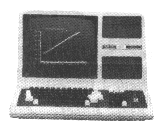
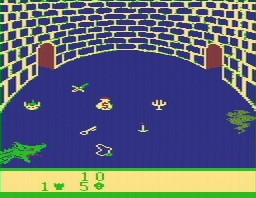
| I couldn't help it. I just had to stick in at least one snapshot of the screen.
This is Buzzard Bait. Unfortunately it's just a 4 color CoCo2 game.
Rest assured that CoCo3 games can look MUCH better than that. Graphics aside though, it's a very good game to play.
|
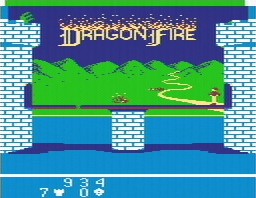
| For no reason - Here's a couple of snapshots of Dragonfire. This game is special in that it's the *only* CoCo 1/2 game
that runs in 8 colors using 4 color PMODE3!. What it does is switch back and forth between both PMODE3 color sets multiple times each
scan line to get all 8 colors on the screen. When the CoCo 3 came out, this fancy trick got messed up because the CoCo 3 had different
video timing. I patched up a copy of Dragonfire to correctly display on a CoCo 3 and this is what it looks like.
|
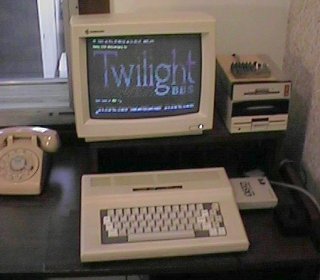
| This is my old BBS setup (Twilight BBS circa 1996). Twilight BBS had been
running from around 1987 to 2000. From 1984 to 1987, it had other names and programs, but
always home-made programs, and almost always on a CoCo. The BBS system consists of a 512K
CoCo3, two 720K 3.5" drives, one 360K 5.25" drive, a Disto Super Controller II, a modified
Samsung monitor, USRobotics 14.4Kbps modem (it's sitting on an adjacent desk), Joysticks,
a 25 year old telephone, and a number of home-made goodies - the 4Mhz accelerator circuit,
internal RS232 card, and a neat 'RGB color mixer' (sitting on top of the drives) which can
be used to adjust/mix the colors of the RGB video. I also (and still to this day) have
another CoCo 3 set up and ready to use next to my PC.
|

| Here's a photo I took of myself for Nick Marentes' 1998 CoCo interviews
article/book. I dug up as *many* CoCo 2s and 3s as I could and stacked them up against a
wall to take this picture - just to show how coo-coo for CoCos I was. Some of the CoCos
behind me didn't work, and at least one of them was just an empty shell. Since then I've
collected some more CoCos... Now I just have to think of some crazy hardware project I can
use them on...
|

| I had to put this up. This was my halloween costume in 2003. This was
the ultimate halloween costume - and it took a lot of work to create a Tron costume. Well,
at least I have a cool photo to show for all the work. The costume was designed so that the
grey parts do not fluoresce and the blue parts do. It looked very close to the way they
looked in the movie in regular light, but when you got near a blacklight, the glowing
effect really came to light.
(If anyone has any halloween costume ideas I can use in 2004 to top this - please email me!)
|